So a while ago I started creating my own shaders for PPSSPP, because I didn't quite like the ones shipped with the program, or liked the ones on the forum either. After about half a year in development I can say that I am finally able to release these to the public. Enjoy a somewhat fresher look in your daily PSP gaming.
The shader is based on the multi-pass processing idea, which means that passes can be interchanged with each other and disabled using a single preprocessor keyword. Simply comment out the line with the ENABLE_PASSNAME on it and it will no longer be in the compiled shader.
What does this get you? It allows you to have different combinations of shaders without having to ask people on the forum to change or adapt the shader for you, given that the passes are built into it. Changing the configuration of the shader is also now an easy task, since almost all configuration values are at the top of the file, documented.
Screenshots & Videos:
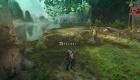
Monster Hunter Portable 3rd HD
(1.0)
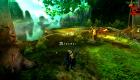
(1.1)
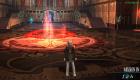
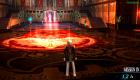
 Final Fantasy Type-0
(1.0)
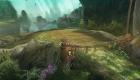
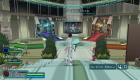
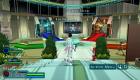
 Phantasy Star Portable 2
(1.3)
 Features:
- Fully customizeable (Build-your-own-Shader Style)
- Supports both NVidia and AMD/ATI GPUs, some IGPs supported as well.
- Multi-Pass Architecture
- Passes / Filters / Effects:
- Diffuse Input (duh, this is required for every shader)
- Antialiasing Filter (adapted from fxaa.fsh)
- Sharpen Filter
- Bloom Effect (created using NVidia GPU Gems)
- Color Manipulator (created using NVidia GPU Gems)
- Vignette Effect
- Scanlines/ "CRT" Effect (adapted from crt.fsh)
- Curvature Effect
Changelog:
- Version 1.0 (24.09.2014 16:24)
 shaders.zip (Size: 12.3 KB / Downloads: 2318)
- [New] Added presets for games.
- [Fix] Changed to own ini instead of modifying defaultshaders.ini
- [Fix] Fail to compile on old GeForce cards.
- [Fix] Fail to compile on newer GeForce drivers.
- [Fix] Temporarily use invalid GLSL version to bypass compiler bug on ATI cards.
- Version 1.1 (05.11.2014 10:10)
ppsspp-multi-pass-1.1.zip (Size: 25.09 KB / Downloads: 1403)
- [New] Added Scanlines/CRT effect pass (adapted from crt.fsh).
- [New] Added curvature effect.
- [New] Added new preset for Kingdom Hearts: Birth By Sleep and LUMINES II.
- [New] Now licensed under CreativeCommons BY-SA 4.0, can be shipped with PPSSPP if demand is there.
- [Fix] Use a valid GLSL version, as the compiler bug is fixed.
- [Fix] Precision on computers was only mediump instead of highp.
- [Fix] Update presets to use latest shader passes and configurations.
- [Fix] Fix Bloom ignoring horizontal axis completely.
- [Fix?] Hopefully fixed random crashes during runtime with AMD and NVidia cards on two seperate screens.
- Version 1.2 (07.11.2014 13:23)
ppsspp-multi-pass-1.2.zip (Size: 27.05 KB / Downloads: 1195)
- [Fix] AntiAlias & Bloom Pass: Fix usage of sampler0 and use Pass_Diffuse instead.
- [Fix] Vignette Pass: Reduce instructions by saving input color in a variable.
- [Fix] Curvature Pass: Correctly set texel center from passed uniforms instead of using texture center.
- [New] Curvature Pass: Added option for branching early-exit, faster on almost all cards that support branching (default active).
- [New] Curvature Pass: Added feather parameter to specify softness of border.
- [New] All Passes: Access to c_texelCenter.
- [Thanks] to the anonymous e-mail sender for the idea and pseudo-code of the feather option.
- Version 1.3 (02.12.2014 04:39)
ppsspp-multi-pass-1.3.zip (Size: 32.82 KB / Downloads: 3253)
- [Fix] Scanline Pass: No longer depends on Integer support.
- [Fix] Corrected preset names for use inside the PPSSPP menu.
- [New] Curvature Pass: Use simple mathemathical way instead of measuring distance.
- [New] Curvature Pass: Added option to use old feathering method, obviously slower.
- [New] Preset for 'Phantasy Star Portable 2' added.
Installation & Download:
- Download latest version (see above).
- Extract into "[PPSSPP]\assets\shaders".
- Restart PPSSPP, the shaders should now show up.
- Select the shader that matches your game.
Customizing the shader:
- Configuring Passes:
Each pass has a documented configuration at the top of the shader file, allowing you to easily edit their settings, including disabling that pass. Some passes even have multiple modes of operation that change the final result quite a bit.
You can enable a pass by uncommenting the line with ENABLE_PASSNAME on it and disable it by doing the opposite, commenting it out again. Same goes for the different modes of operation, sometimes it's a multiple choice, sometimes it's a single choice. Read the comments above the line or to the right of it to know more.
- Moving Passes:
Passes are surrounded by an #ifdef construct, which is what allows this multi-pass architecture to even work. Without our trusty preprocessor, I wouldn't have had this choice and would have to actually implement this feature into PPSSPP.
Simply select the entire pass (including the comment line that says which pass it is) and cut it out, then paste it at the spot you want it. Copying works too, in case you want to duplicate a pass (why would you want to do that...).
- Creating and replacing passes:
All passes have one thing in common: their structure, parameters and return value type. They each get passed a 2-component vector as a texture coordinate to generate a 3-component vector RGB color for. The reason I excluded the alpha channel here is that it is never used, storing values for later passes should be done in globals.
In a pass, you have access to the following variables and constants:
- sampler0 - The screen texture. (Preferably call Pass_Diffuse instead, in case the variable changes name in the future.)
- vec2 u_texelDelta - Distance between each texel in x and y direction.
- vec2 u_pixelDelta - Distance between texel when AtOutputResolution is true.
- vec4 u_time - The time passes by PPSSPP to the shader
- vec2 c_resolution - Actual rendering resolution.
- vec2 c_outputresolution - Actual output resolution.
- float c_resolutionScale - Multiplier used for the rendering resolution.
- vec2 c_texelMin - Minimum texture coordinate before you hit black pixels.
- vec2 c_texelMax - Maximum texture coordinate before hitting black pixels.
- vec2 c_texelCenter - Absolute screen texture center. (NEW)
- vec2 v_v2TexCoord - Original texture coordinate passed to the shader.
- vec4 v_v4FragColor - Current output value, not really used.
- Plus: any configuration constant defined and your own globals.
Then you have access to the following functions and macros:
- vec3 RGBToHSV(vec3 RGB) - Convert an RGB color to HSV.
- vec3 HSVToRGB(vec3 HSV) - Convert HSV back to RGB color.
- float Gaussian(float x, float deviation) - Gaussian distribution at x using deviation.
- vec3 Pass_Diffuse(vec2 texCoord) - Diffuse pass to grab texture data directly from buffer.
- vec3 PREVIOUS_PASS(vec2 texCoord) - The previous pass.
- Plus: any other pass that is currently enabled, check using #ifdef ENABLE_PASSNAME ... #endif.
In addition to that, you have access to the first parameter of your pass, which always will be the texture coordinate you are supposed to return values for: vec2 v2TexCoord.
Now with that knowledge in mind, lets get to creating a new pass: First, select the entire Diffuse pass and copy it, then paste it to where your newly created pass should be executed. Rename the new pass to what you want, make sure to rename it in the #ifdef structure aswell. Now add a "#define ENABLE_PASSNAME" line in the configuration area of the shader and your shader will be compiled and executed.
After you've done that, you can start editing the new pass function and make it do what you wanted it to do. Remember to respect the texture parameter, call the previous pass and return the final color at the end. Make sure to check for errors using GLSL Validator, as PPSSPP will just crash on this monster of a shader (This bug has been fixed. Still better to use GLSL Validator for this).
Tested Games and Configurations (Compatability List):
- AMD FX-6100, ATI Radeon HD 5770 (Driver v13.4):
- Final Fantasy Type-0: 100%
- Kindom Hearts Birth By Sleep: 100%
- LUMINES II: 100%
- Monster Hunter Portable HD: 100%
- Phantasy Star Portable 2: 100%
- Wipeout Pulse: 100%
- AMD FX-6100, NVidia Geforce 550 Ti (Driver 340.52):
- Final Fantasy Type-0: 100%
- Kindom Hearts Birth By Sleep: 100%
- LUMINES II: 100%
- Monster Hunter Portable HD: 100%
- Phantasy Star Portable 2: 100%
- Wipeout Pulse: 100%
Credits & Thanks:
FXAA adapted from fxaa.fsh. Scalines/CRT effect adapted from crt.fsh. Bloom and Color Manipulator are created using NVidias GPU Gems, extra thanks for the reduced amount of texel gathers shown in a later GPU Gems edition.
Thanks to everyone who has worked on PPSSPP for making it work almost flawlessly on both my Computer and Android phone.

 Search
 Member List
 Calendar
 Help
Help /
PPSSPP Multi-Pass Shaders
/
PPSSPP Multi-Pass Shaders


